Docs — Folder Lister
Setup guide, tutorials, FAQ, and legal text in one readable docs page.
How FolderLister works
FolderLister is a listing automation tool designed for sellers who work with collections or large batches of items. Instead of creating listings one by one, the software reads folders and filenames and converts them into structured eBay listings.
By organising images and filenames correctly, sellers can prepare many listings quickly. FolderLister then generates drafts that can be reviewed and published.
This documentation explains the main workflows used in FolderLister:
- Loading items from folders
- Creating listings with AI voice and image analysis
- Editing and expanding MultiListings (variation listings)
- Using the Variations Bulk Editor
- Understanding how filenames control titles and image bundling
Alexander the Great Coin[UK].jpg already contains the country, material or price — Folder Lister builds the listing without you typing anything. Best for collectors and resellers who list the same kind of item over and over.
If you prefer a visual explanation, scroll down to the tutorial videos section below.
First-Time Setup — Folder Lister
This guide walks you through your very first Folder Lister setup: getting your license from the website, installing the app, entering your license key, signing in with eBay, and preparing the app for your first run.
1. Get your license from the website
Visit folderlister.com and request your license key. Enter your email address and click Send code. A verification code will be sent to that email address. It can take a minute to arrive, so check your inbox and junk/spam folder. Enter the code on the website, click Get license key, and your license key will be emailed to you.
2. Download and install the application
Download the installer from: https://download.folderlister.com Run the installer and launch the application.
3. Enter your license key before signing in
On first launch, the app will show the welcome dashboard. Before you try to sign in with eBay, open the small menu in the top-left area and select Enter license key… Paste the license key from the email (Ctrl+V) and confirm.
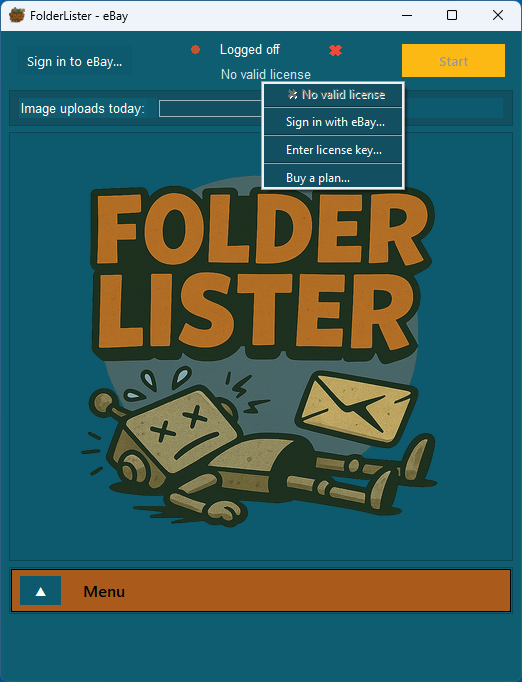
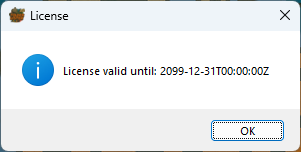
If the license is valid, the app will display your expiry date (example: 2099-12-31). After your first upload session, the license becomes tied to your eBay account and can only be switched once every 3 weeks.
4. Sign in with eBay
Once your license key is entered, click the Sign in with eBay… button and follow the login process. Complete the OAuth steps until the page closes and the app shows:
- Logged in
- Your selected eBay site (e.g., UK)
- A green status indicator
You should now see the eBay environment (env), site, and connection status ticked as OK.
5. Understanding the dashboard
Once logged in and licensed, the main screen shows:
- Your current eBay site (important: set this to the eBay website you're using so Folder Lister fetches the correct policies)
- Your daily image upload limit, visualized as a battery bar
- The Folder Lister robot reacting as uploads progress

6. Open the menu
Click the small ▲ arrow to open the main menu. This is where you can change settings and start the workflow that fits your way of listing.
For the fastest first run, continue with the Bulk AI & Voice guide below. If you want to work with reusable profiles and full folder trees, jump to Classic mode.
Bulk AI & Voice Listing — from photos to live eBay drafts
This walkthrough covers the fastest route to creating multiple eBay listings at once using image analysis and voice notes. You load photos of several different items, the AI suggests categories, titles, and item specifics from the images, you add short voice notes for facts that aren’t visible (price, size, condition, country of origin), and Folder Lister builds the drafts for you. You finish in the Web Editor and click Publish ALL.
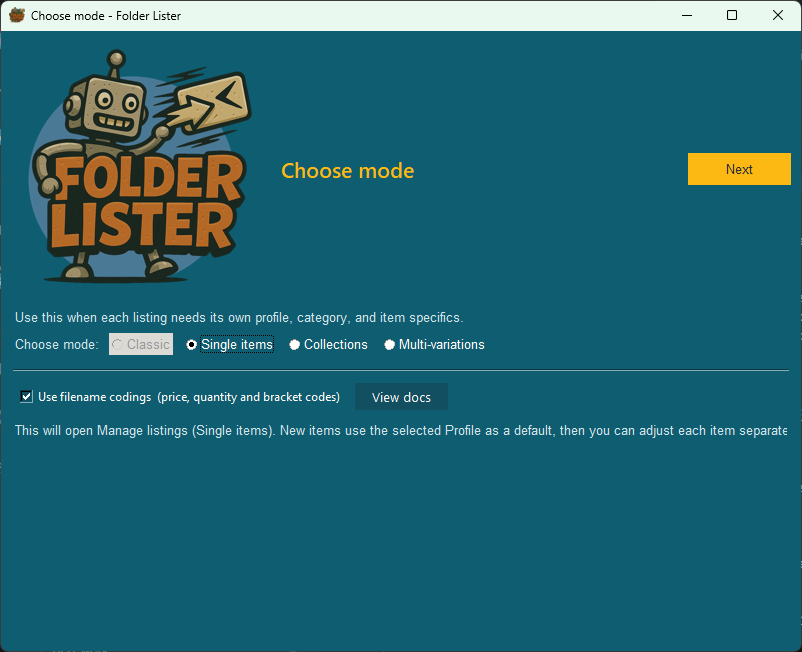
Use Single items mode when each item needs its own category and item specifics (for example a denim jacket plus an enamel car badge in the same batch). For a large batch of items that all share a single category, Classic mode is faster because one profile covers everything.
1. Start Folder Lister and choose Single items
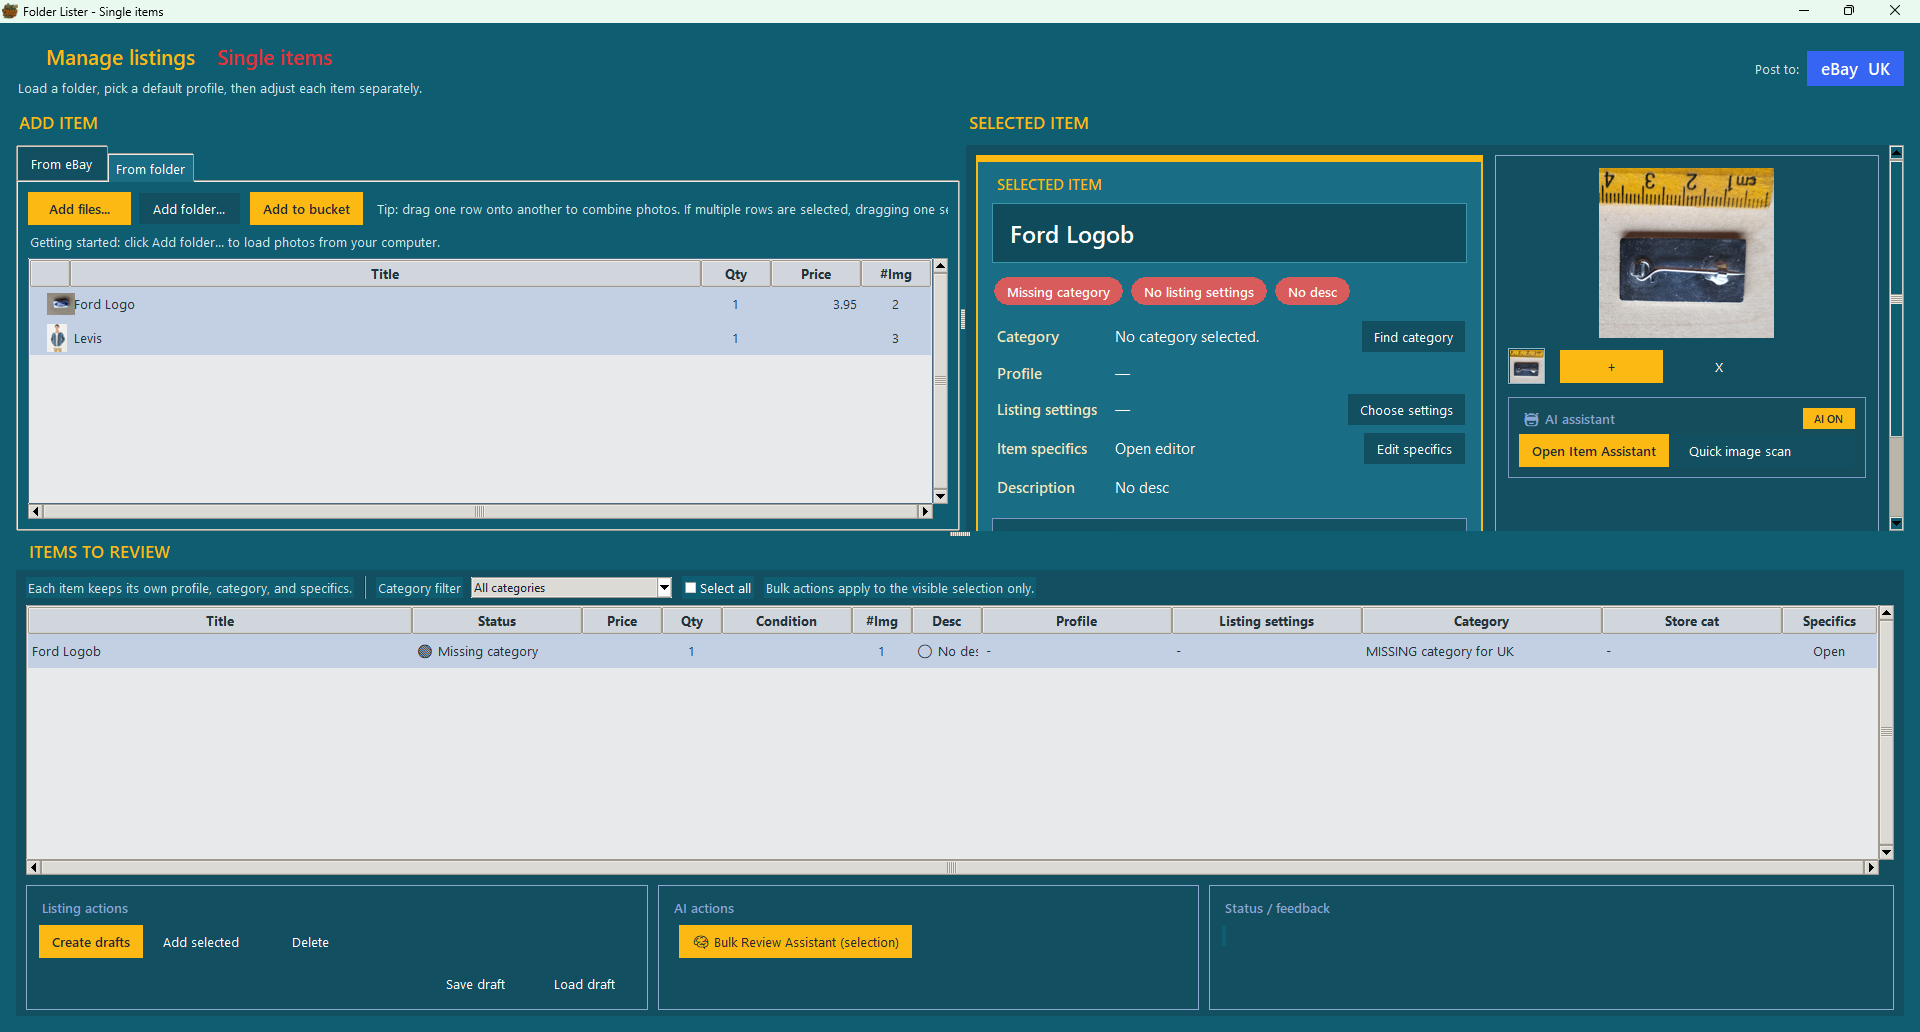
On the home screen, click Start. In the Choose mode dialog pick Single items and click Next. This opens Manage listings — Single items, where each item keeps its own profile, category and specifics.
2. Switch to the From folder tab and load your photos
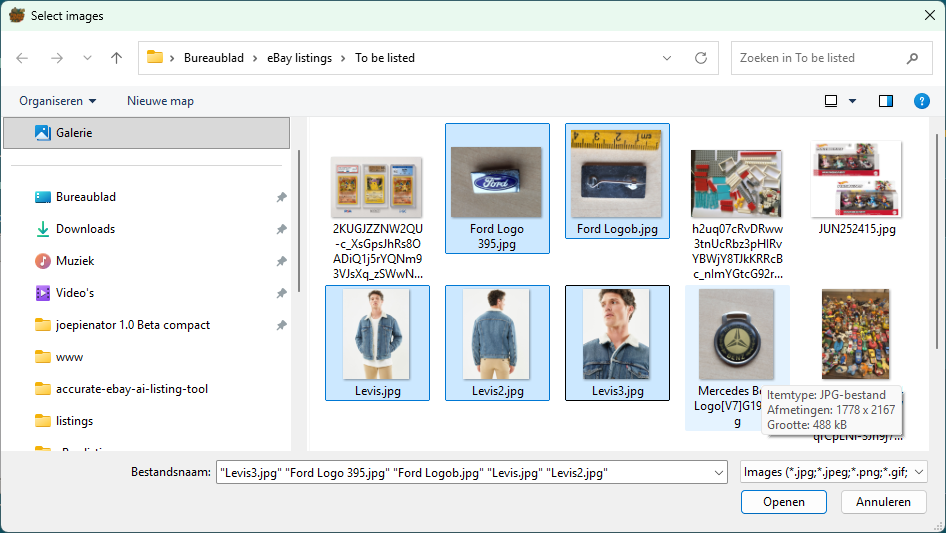
Click the From folder tab in the top-left. Then click Add folder… to load every photo from a folder, or Add files… to pick individual photos with the standard Windows file picker. You can also select a whole folder in one go.
3. Combine multiple photos of the same item (drag & drop)
When a product has several photos (for example Levis.jpg, Levis2.jpg, Levis3.jpg), you don’t need filename tricks. Select the extra rows and drag them onto the main row. The #Img counter on the main row goes up and the dragged rows disappear. Repeat per item.


4. Add the combined items to the bucket
Select the rows you want to list (Ctrl/Shift for multiple) and click Add to bucket, or right-click and choose Add to bucket. The items move to the ITEMS TO REVIEW table at the bottom with status Missing category until the AI finishes analysis.
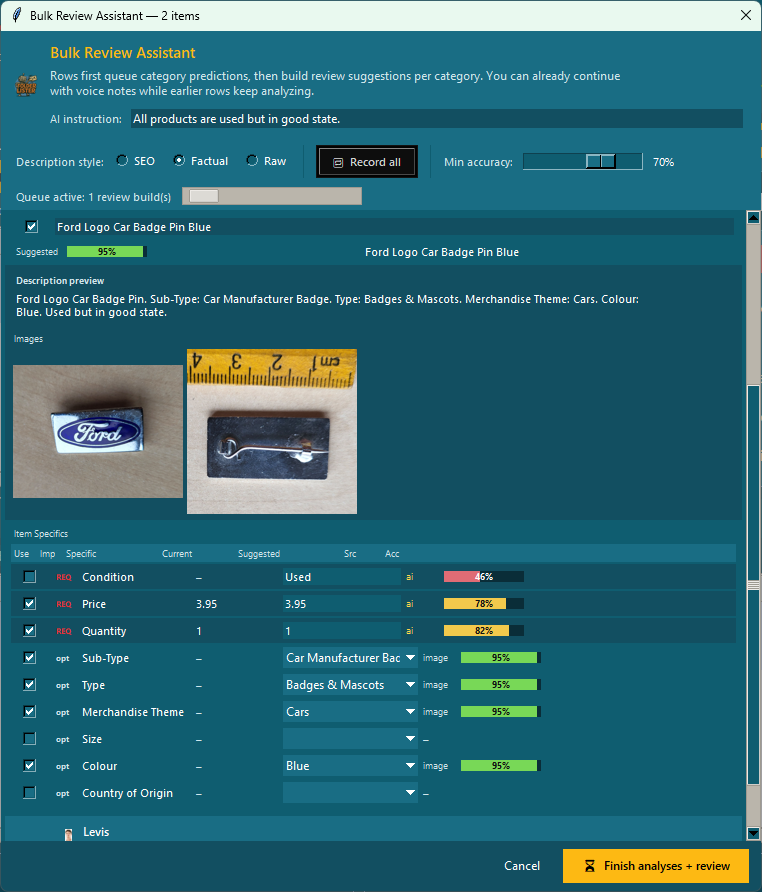
5. Open the Bulk Review Assistant
In the AI actions bar click Bulk Review Assistant (selection). The assistant queues category predictions for every selected item, then builds review suggestions per category. You can already start voice-noting earlier items while later items are still being analysed.
At the top of the window:
- AI instruction – a general prompt that applies to every item in the batch. A typical example: “All products are used but in good state.”
- Description style – SEO / Factual / Raw. Factual is the safe default for second-hand items.
- Record all – starts a bulk voice recording session across all items (press Space to jump to the next item).
- Min accuracy – only apply AI suggestions above this confidence threshold.
6. Record voice notes per item (while images analyse)
Click Record all. The first item expands, the record button turns red, and the status line tells you [Space] = next item. For each item, speak any facts the AI cannot see in the photos:
- Selling price (e.g. “Selling for 57.95 pounds”)
- Size or dimensions (e.g. “Size M”)
- Country of origin (e.g. “Made in China”)
- Condition details (e.g. “Used, very good”)
- Anything else you want added to the description
Press Space to move to the next item without stopping. When you’re done, click STOP recording.
7. Review the AI suggestions per item
When the AI has finished, each item shows a full review panel: the predicted category (with alternative suggestions and confidence percentages), a suggested title, a description preview, and an item-specifics table.
The Src column tells you where each value came from:
- image – extracted from the photos
- voice – transcribed from your voice note
- text – parsed text from your voice note (for example a price or a size)
- merged – combined from multiple sources
The Acc bar next to each row shows confidence: green = high, yellow = medium, red = low. Adjust values in the dropdowns where you disagree.

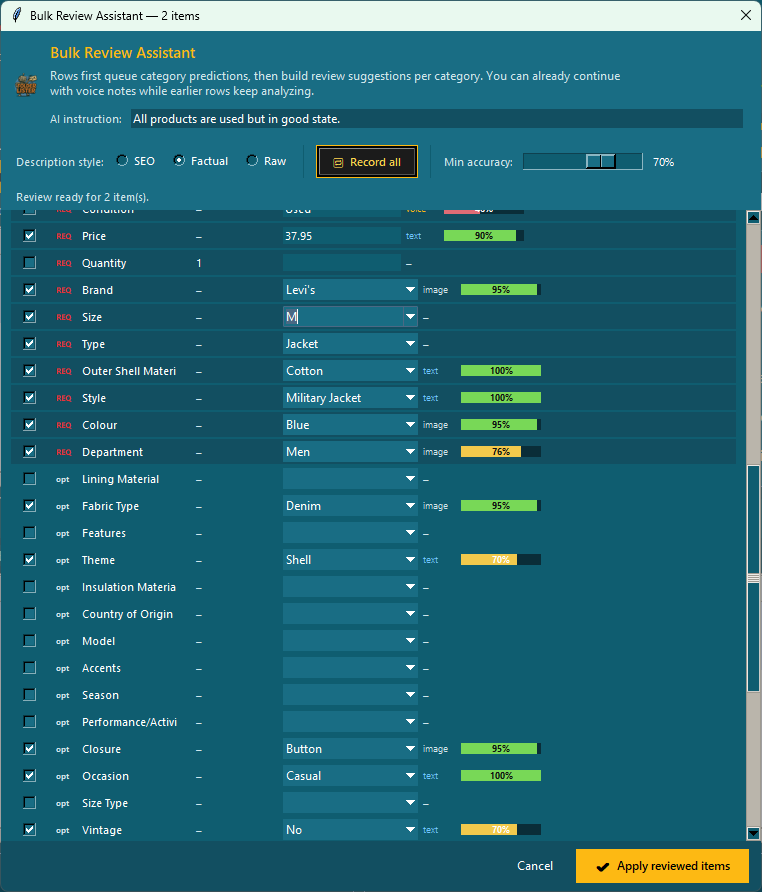
8. Apply the reviewed items
Click Apply reviewed items at the bottom of the Bulk Review Assistant. The assistant closes and the rows in ITEMS TO REVIEW switch to status AI analyzed. The title, category, condition, item specifics, and description are now filled in on each row, and the SELECTED ITEM panel shows three green badges: Category set, Listing settings set, AI draft.

9. Assign listing settings (bulk, with Shift)
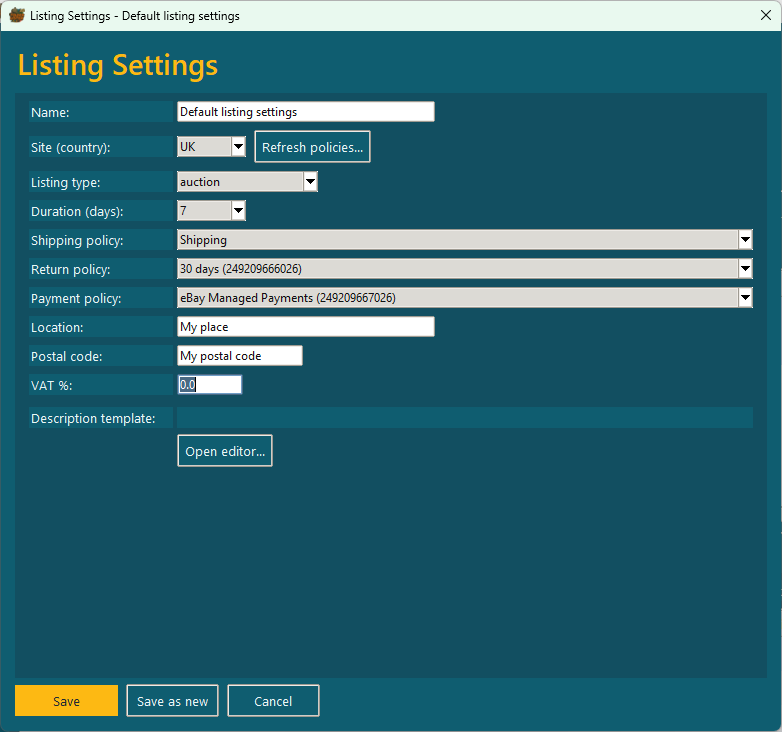
Every item needs a listing-settings profile (format, duration, shipping / return / payment policy). Click the Listing settings cell on a row to pick a saved profile from the dropdown, or choose Edit listing settings… to create one.
In the editor, set the Site (country) first and click Refresh policies… to pull the eBay policies for that site. Fill in listing type, duration, shipping / return / payment policy, location and VAT, then Save (or Save as new).
To apply the same profile to many items at once, select the rows with Shift+click and change the Listing settings cell — the choice is applied to every selected row.
10. Create drafts and continue through the scheduler
Click Create drafts at the bottom-left. The Publish scheduler dialog appears. Leave it empty to publish immediately, or pick a start date and add minutes between listings so a large batch rolls out in a controlled stream instead of all at once. Click Continue to upload the images to eBay and submit the drafts.

11. Final review in the Web Editor
When the upload finishes, Folder Lister opens the Web Editor in your browser. Items are grouped by category. You can review titles, category ID, quantity, start price, shipping / return / payment policy, shop ID, images, and the HTML description. Use the Bulk dropdown + Apply to selected to change a column for many rows at once, or click Manage on a row for detailed edits.
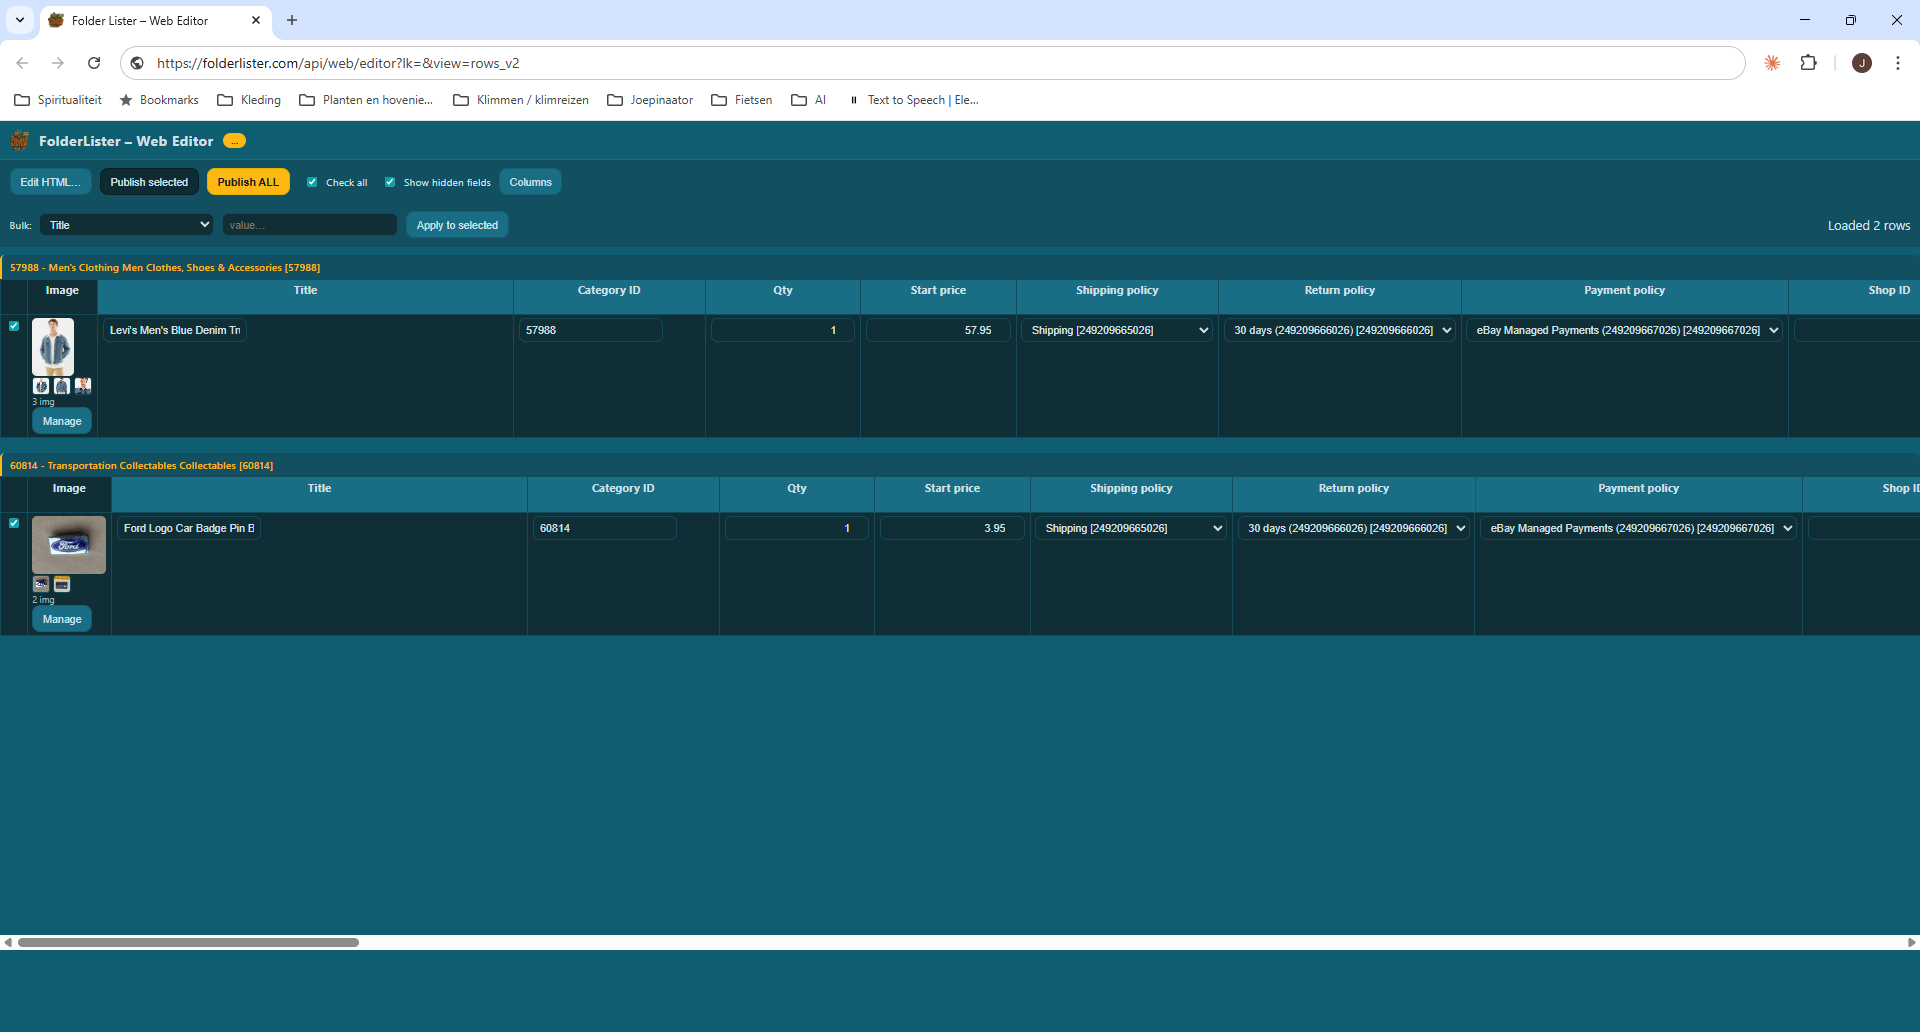
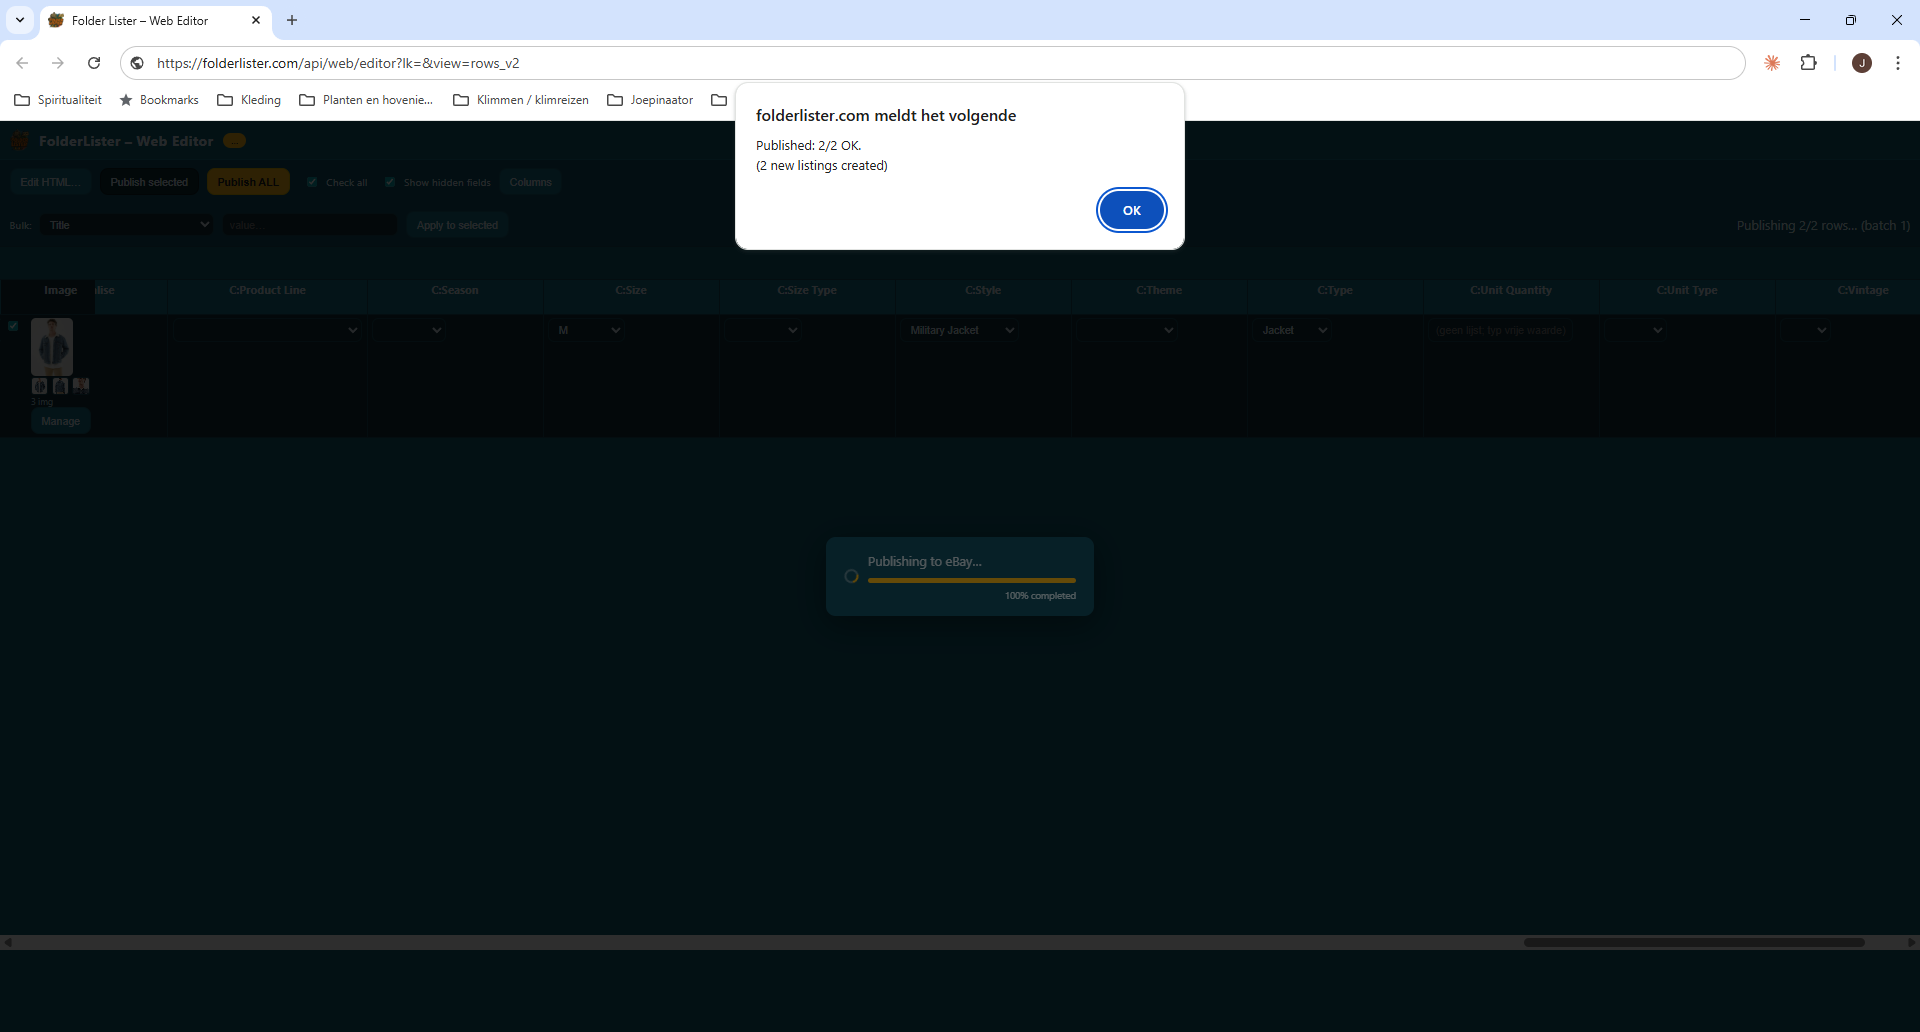
12. Publish ALL
When everything looks right, click Publish ALL (or Publish selected for a subset). Folder Lister sends the listings to eBay and shows a confirmation dialog such as “Published: 2/2 OK. (2 new listings created)”. Your items are now live on eBay.
Classic mode — reusable folder structures and profiles
Classic mode is built for sellers who want to work with complete folder trees instead of a single image folder. You can load a whole structure of folders and link each folder individually to its own reusable profile.
Each profile can store settings such as eBay category, item specifics, description text, and other per-folder values. This makes Classic mode ideal when you want to keep using the same setup for repeat listing batches.
One folder can have one profile, and one profile can stay active across multiple country sites. If you enable more than one country in the main menu, the profile editor lets you select a category per active site while keeping all item specifics and profile settings together.
1. Select your root folder
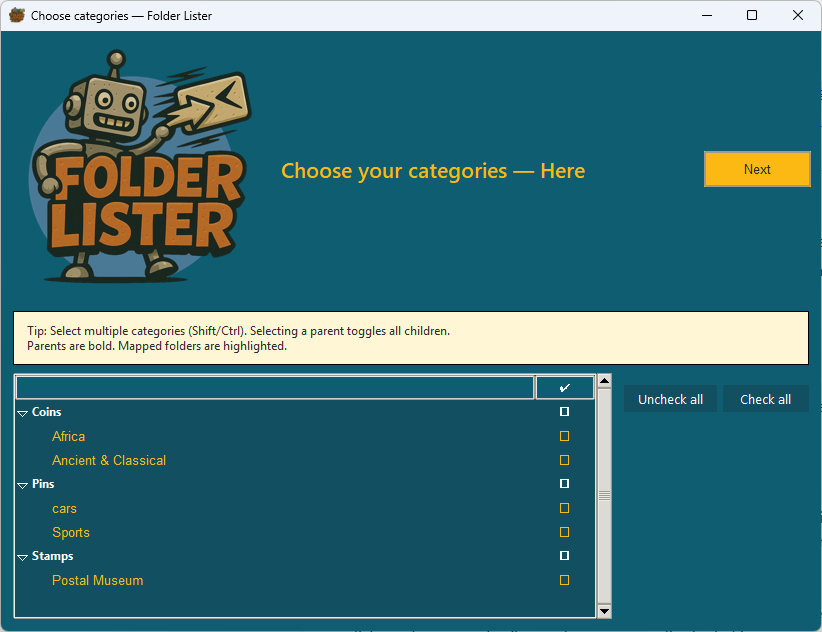
Start Classic mode and select the main storage folder that contains your listing folders. Folder Lister will scan the structure and load the folders it finds.
A clear folder structure is useful because each folder can be linked to its own profile with its own category, item specifics, description text, and store-related settings.
C:\eBay listings
├─ pins
│  ├─ cars
│  ├─ motors
│  └─ sports
├─ coins
│  ├─ ancient
│  └─ country
│     ├─ Netherlands
│     └─ England
└─ cards
   ├─ europe
   ├─ world
   └─ USA
2. Category Mapping
After selecting your folders, the app will open the Category Mapping Setup screen:
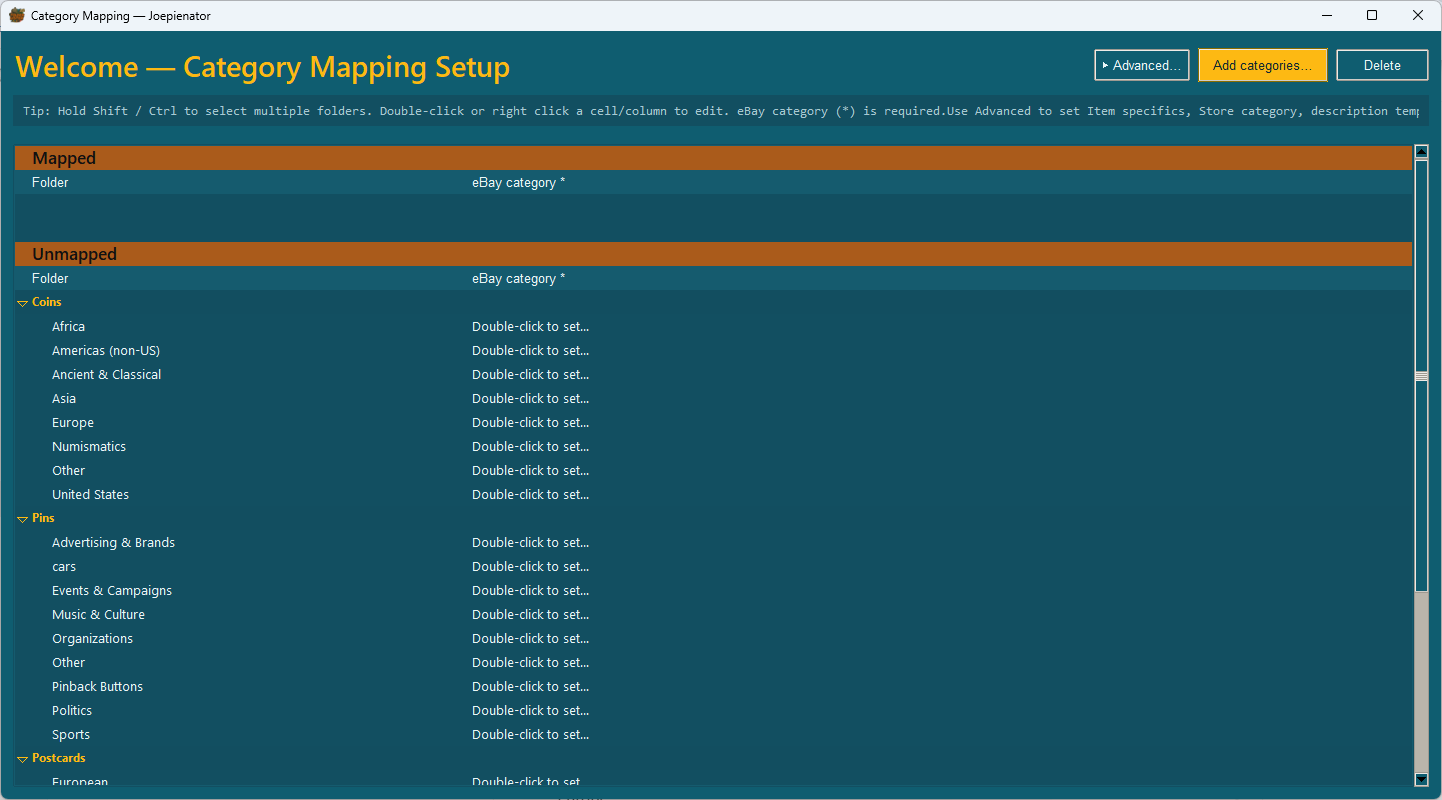
Here you can:
- Double-click a row to set the correct eBay category
- Use Shift / Ctrl to select multiple folders at once
- Right-click to edit a profile or apply settings quickly
- Use the search box to find matching categories (comma-separated keywords improve results)
3. Edit profile
Open Edit profile for the selected folder to configure the reusable profile behind that folder.
In the profile window you can:
- Fetch and set the eBay category
- Set item specifics for that folder/profile
- Select categories for other active country sites when multiple countries are enabled in the main menu
- Keep all of those country-specific categories active under the same profile
- Set description text and other profile-based listing values
This means one profile can be reused to post the same folder structure to multiple eBay country sites while keeping the right category selection and item specifics together.
4. Start – prepare your first listing run
When your folders and profiles are ready, click Start from the main screen.
Select the folders you want to upload in this batch. Tick the boxes next to the folders, then press Next.
5. Basic listing settings & scheduler
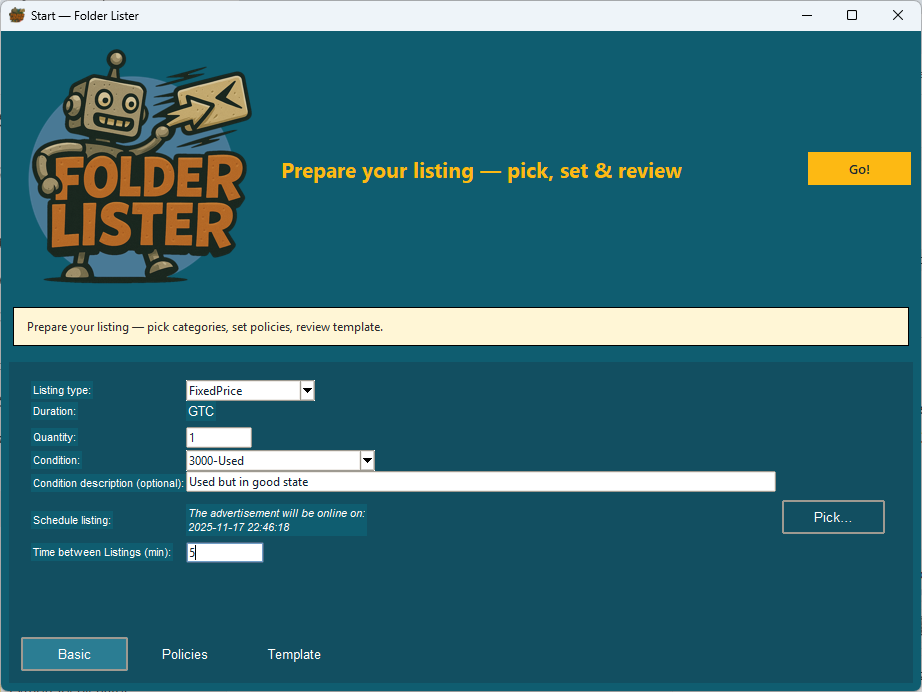
On the Basic tab you choose:
- Listing type (FixedPrice / Auction)
- Duration
- Quantity
- Condition and optional Condition description
The scheduler is especially useful for auctions. With Schedule listing you pick the start date and time; with Time between listings (min) you add a small delay between each listing so hundreds of listings go live in a controlled stream instead of all at once.
6. Policies & VAT
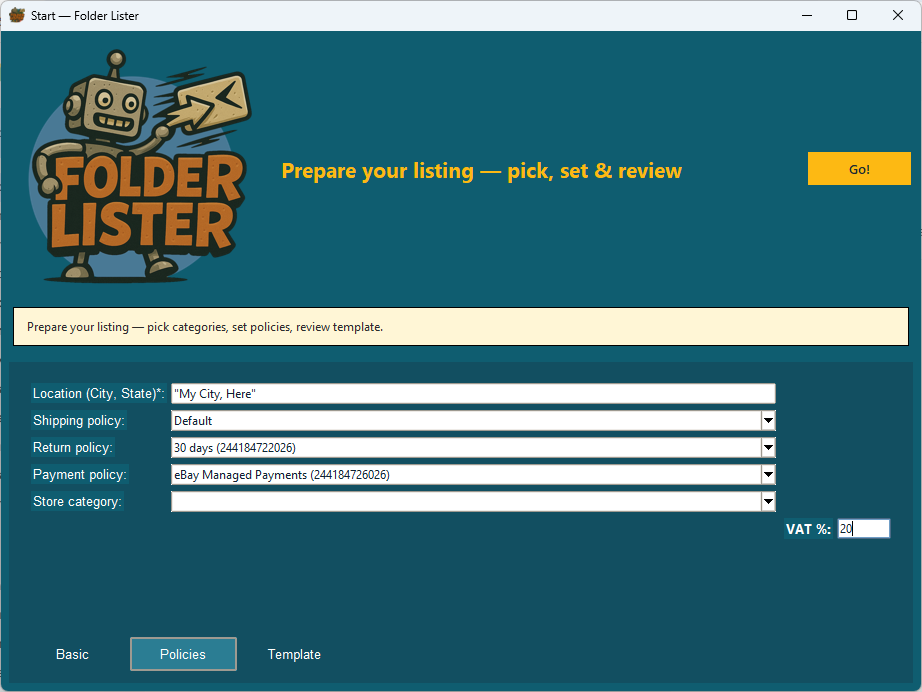
On the Policies tab you set:
- Location (City, State)
- Shipping policy
- Return policy
- Payment policy
- Store category
- VAT % (optional)
Business policies are loaded automatically from your eBay account and remembered for next runs. Your eBay account must be configured for business policies; see eBay's own help pages for instructions.
7. Create your first draft batch
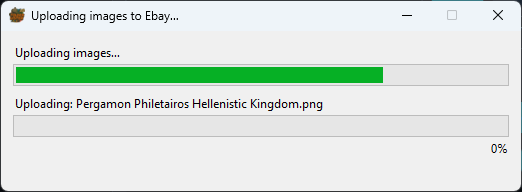
When everything is set, press Go!. Folder Lister uploads your images to eBay (EPS). A progress dialog shows which image is being uploaded.
When the upload finishes, the app opens the Web Editor with your drafts ready for review and bulk editing.
Next steps:
- Fine-tune large batches of drafts with the Bulk Editor.
Bulk Editor
The Web Editor is where your uploaded drafts land. Here you can review images, tweak titles, and edit hundreds of listings at once.
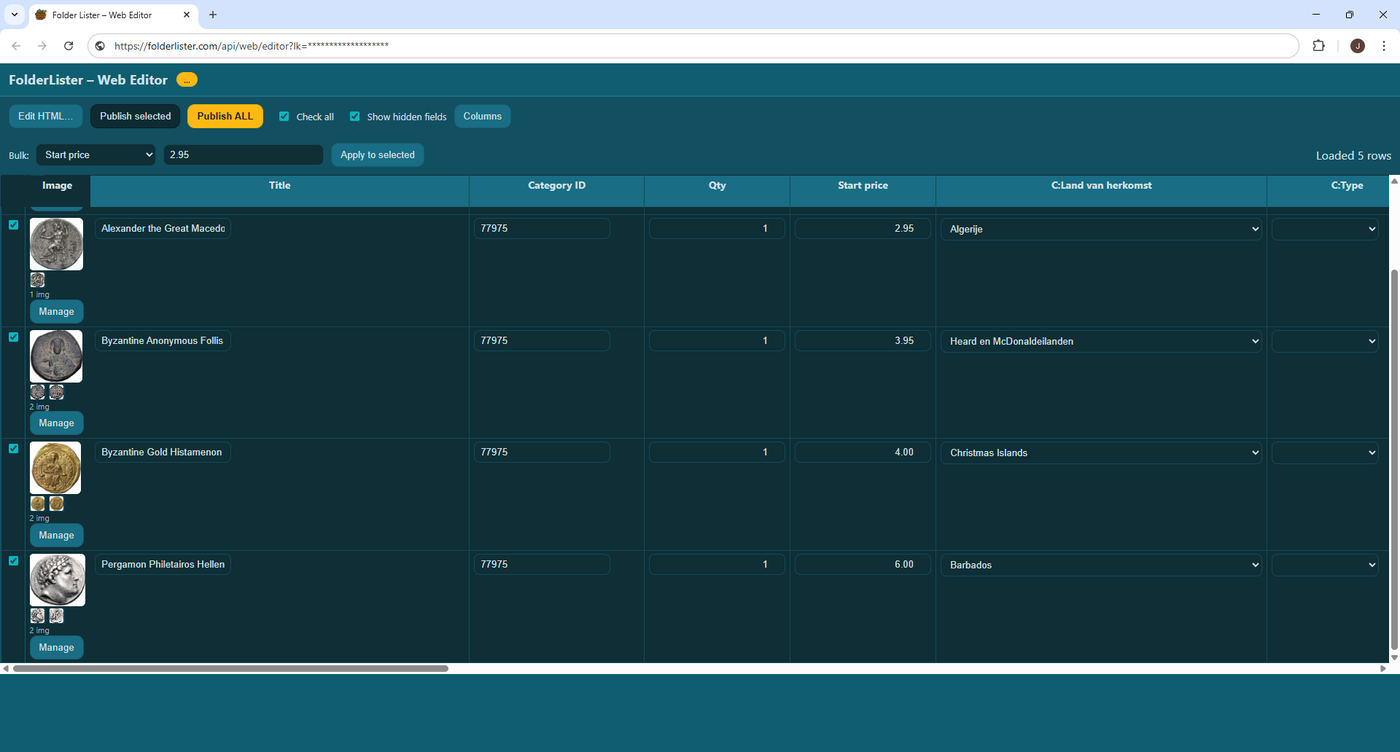
Bulk editing fields
To bulk-edit listings:
- Tick the checkboxes for the listings you want to change.
- Use the Bulk dropdown at the top to choose which column you want to edit (for example Start price).
- Enter or pick the new value.
- Click Apply to selected.
This works for prices, quantities, item specifics, categories, policies and more.
Publish drafts
When everything looks good, publish your drafts to eBay:
- Publish selected – only the checked listings are sent.
- Publish ALL – the entire batch is sent.
Be mindful of your eBay fee structure and free-listing limits before publishing large batches.
Video tutorials
These tutorials show several key FolderLister workflows, including editing existing eBay variation listings, creating a new MultiListing from a folder, and an additional tutorial video.
Edit eBay variation listings
This tutorial shows how FolderLister can edit and extend existing eBay variation listings. The MultiLister workflow and Variations Bulk Editor allow you to reopen a listing, add new items, and manage variations in bulk.
Create a new MultiListing
This tutorial shows how to create a new MultiListing in FolderLister by loading items from a folder, adding them to a multi-variation listing, applying a profile, and preparing the listing before publishing.
Additional FolderLister tutorial
This additional tutorial has also been added to the docs video section so you can watch it alongside the other FolderLister walkthroughs.
FAQ
Is the app free?
Yes, you can use it for free. Launch memberships may convert to paid later with advance notice.
Who pays eBay fees?
You do. Always check free‑listing limits and local rules before bulk publishing.
How do I report issues?
Email support@folderlister.com with logs/steps to reproduce.
Privacy Policy
Data we process
- Account & licensing: email address, license key, plan/trial status.
- Operational: logs (timestamps, errors), and IP strictly for security, rate-limiting, and abuse prevention.
- eBay integration: tokens/IDs required to act on your behalf with eBay APIs.
- Support: messages you send to support@folderlister.com.
We do not sell your data, profile you for ads, or train models with your content.
Purposes & legal bases (GDPR)
- Provide the service/features you request (contract necessity).
- Security, fraud and abuse prevention (legitimate interests).
- Legal compliance where applicable (legal obligation).
- Optional product feedback (legitimate interests/consent).
Minimization & retention
- We aim to collect/store as little as possible.
- Technical logs retained only as long as needed for reliability and security, then deleted or anonymized.
- You can request deletion of account/identifying data where applicable.
Sharing & processors
We use trusted sub‑processors (e.g., hosting/email) solely to run the service; they may not use your data for their own purposes.
Security
We apply appropriate technical and organizational measures (encryption in transit, least‑privilege access, monitoring). No method is perfect, but protection gets maximum attention.
International transfers
If data crosses borders, we rely on appropriate safeguards (e.g., SCCs) where required.
Your rights
Depending on jurisdiction (EU/UK), you may have rights to access, correct, delete, restrict, port, object, and to complain to a supervisory authority (NL: Autoriteit Persoonsgegevens).
Children
Not directed to children; intended for adult/business users.
Changes
Material changes will be announced in‑app or via email with reasonable notice.
Contact
Terms of Use (EULA)
Responsible use & eBay costs. You are solely responsible for any eBay fees; be mindful of per‑site free‑listing limits before publishing. Misuse may lead to IP blocking or account termination.
1. License Grant
Personal, limited, revocable, non‑exclusive, non‑transferable license to install/use the App on devices you own/control, solely to create/manage eBay listings with your own account(s). The App is licensed, not sold.
2. Ownership
All IP in the App, documentation, designs, and branding belongs to the publisher and its licensors. No copying, redistribution, or reverse‑engineering, except where mandatory law allows.
3. Third‑Party Services (eBay)
Your use of eBay remains subject to their terms/policies. You are responsible for any costs. We are not affiliated with eBay and not liable for third‑party costs, outages, or policy changes.
4. Acceptable Use
No spam/abuse, no bypassing rate limits, no unlawful or infringing content. Any form of spam may result in a permanent ban and/or IP block.
5. Data & Privacy
We minimize data and protect it. See the Privacy Policy.
6. Trials, Launch Memberships, Refunds
- Free trial or free launch membership available for testing.
- No general refund policy. In exceptional cases where the App is insufficiently functional despite support efforts, we may offer a discretionary remedy.
- Launch memberships may later convert to paid plans; we will inform you in advance with clear options before charges apply.
7. Updates & Changes
We may add/change/remove features. Updates may be required to continue use. Terms may change with notice where required.
8. Disclaimers
THE APP IS PROVIDED “AS IS” AND “AS AVAILABLE.” TO THE MAXIMUM EXTENT PERMITTED BY LAW, ALL WARRANTIES ARE DISCLAIMED, INCLUDING MERCHANTABILITY, FITNESS FOR A PARTICULAR PURPOSE, AND NON‑INFRINGEMENT.
9. Limitation of Liability
TO THE MAXIMUM EXTENT PERMITTED BY LAW, NO LIABILITY FOR INDIRECT, SPECIAL, CONSEQUENTIAL, EXEMPLARY, OR PUNITIVE DAMAGES; TOTAL LIABILITY CAPPED AT AMOUNTS PAID (IF ANY) IN THE PREVIOUS 12 MONTHS. Nothing excludes liability where prohibited by law.
10. Termination
Access may be suspended or terminated for violations or legal reasons. You may stop using/uninstall the App at any time.
11. Export & Compliance
You must comply with applicable laws (export, sanctions, anti‑abuse) and eBay policies.
12. Governing Law
Unless mandatory local law requires otherwise, Dutch law applies; disputes go to the competent courts in the Netherlands.
Copyright Notice
© 2025 Joep Litjens / Folder Lister. All rights reserved.
“Folder Lister” and associated logos/designs are trademarks or trade dress of the owner. eBay and the eBay logo are trademarks of eBay Inc. Folder Lister is not affiliated with or endorsed by eBay.
Open‑Source Acknowledgements
The App may include or reference open‑source components licensed under their respective licenses. Required notices are provided in‑app or on the website. Nothing here limits rights granted by such licenses.
Permitted Use
Except as allowed by mandatory law or applicable open‑source licenses, you may not copy, modify, redistribute, or create derivative works without prior written permission.
Attribution
If you publicly reference Folder Lister (e.g., tutorials/reviews), include a link to folderlister.com and follow fair use/brand guidelines.
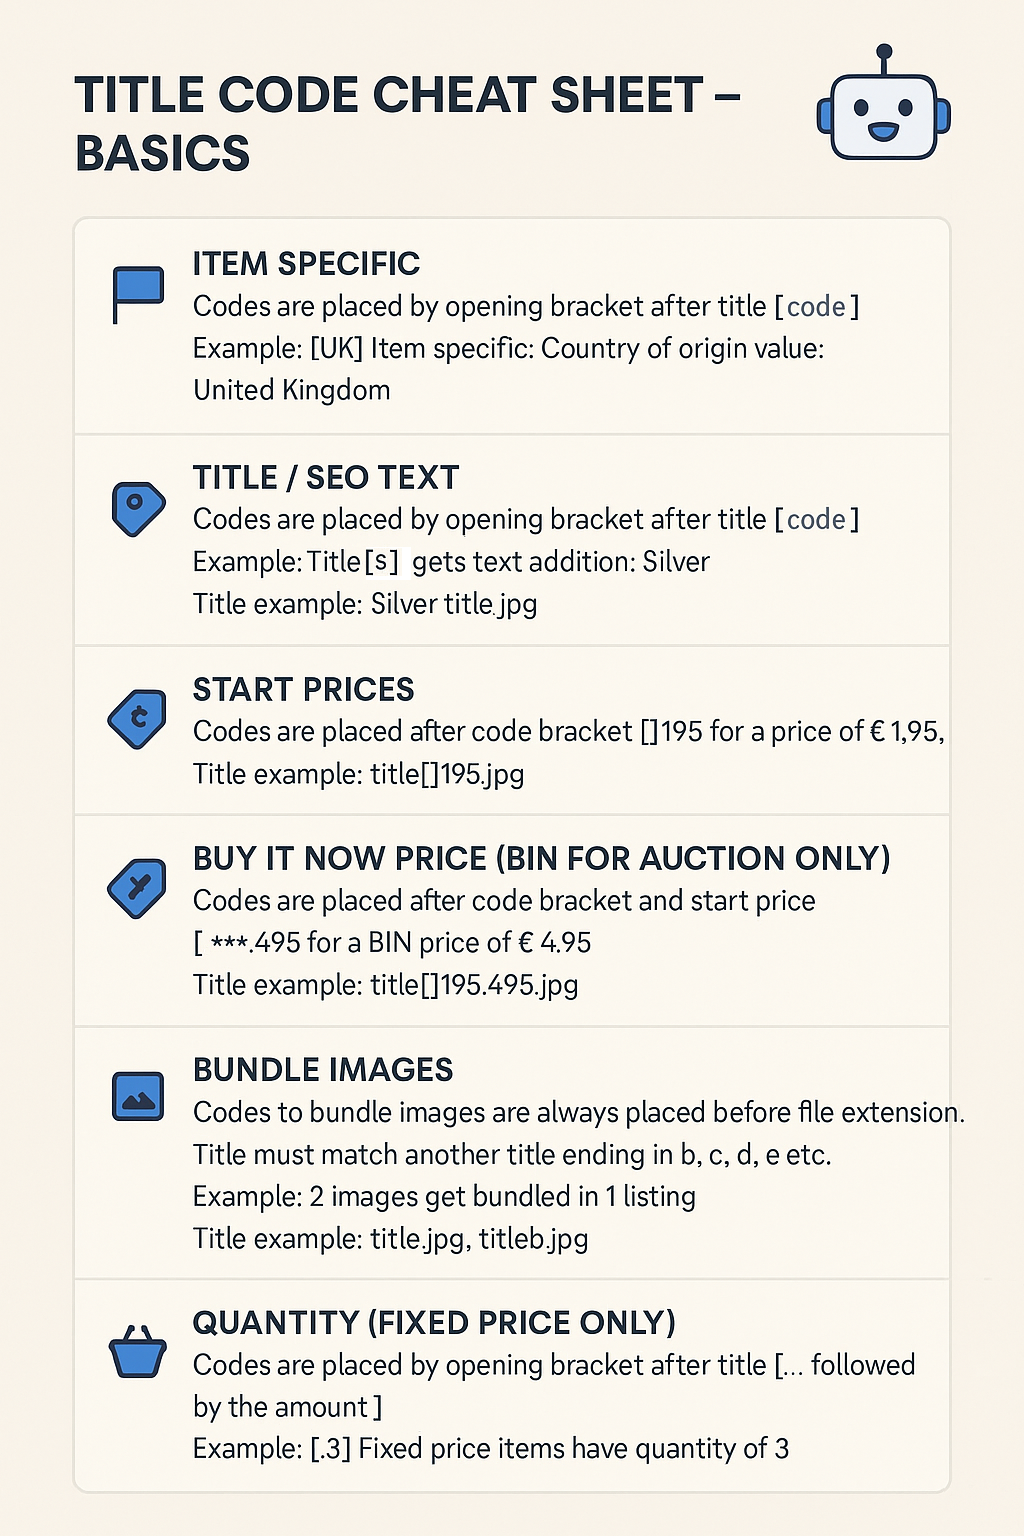
Item specifics & title codes
Item specifics control structured details such as brand, material, size, and country of origin. Folder Lister lets you set them per folder and automate them using short codes in your titles.
Example: set an item specific using a bracket code
In the Item specifics window, select an aspect (for example Material) and use the Edit codes… button (bottom right). Assign a letter and a value. After that, you can use the letter in your filename as [E], [UK], etc.
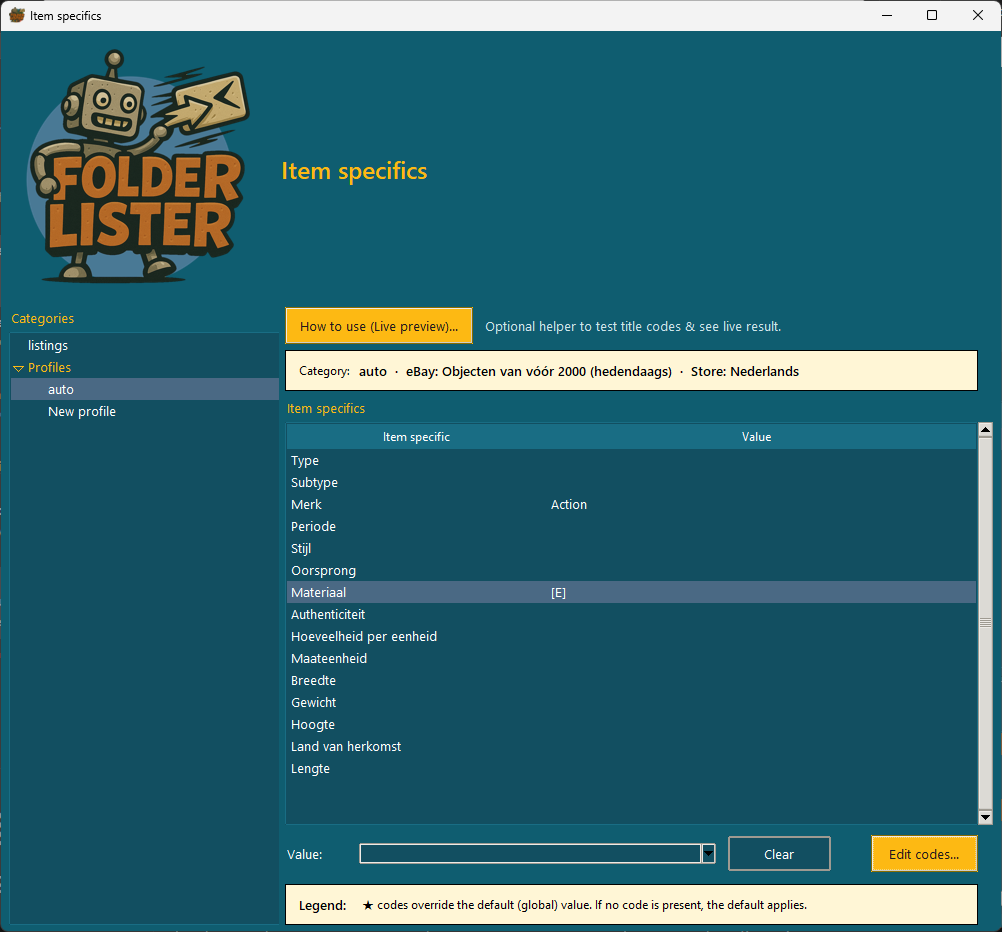
E → Emailbadge [E]295.jpg → Material = Email
1. Folder-level item specifics
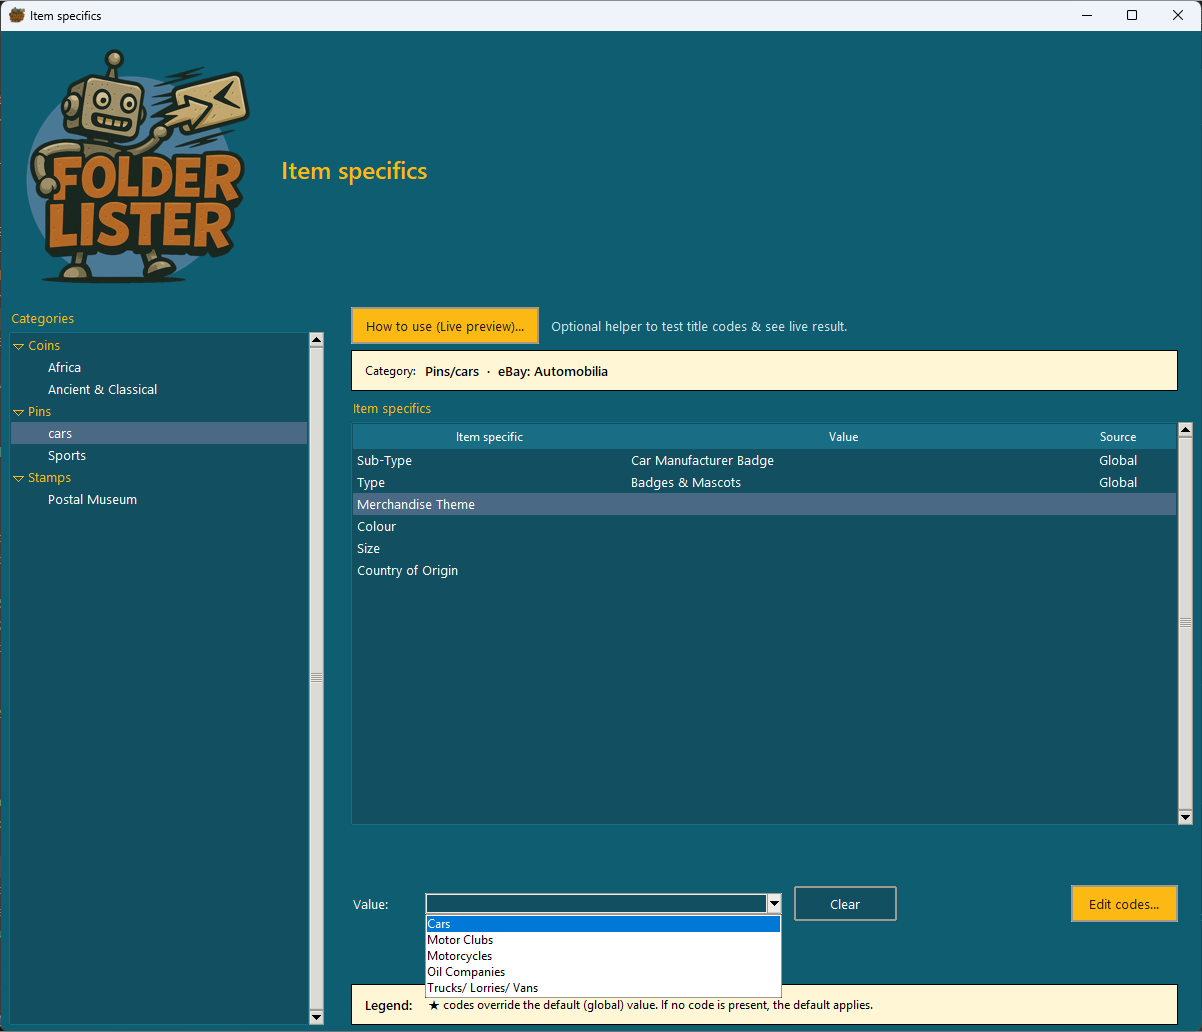
Select a folder in the left tree, then click the item specific you want to edit. At the bottom, choose a Value to lock that specific for the whole folder.
You can still override values later per item in the Web Editor, but folder-level values are a quick way to keep large collections consistent.
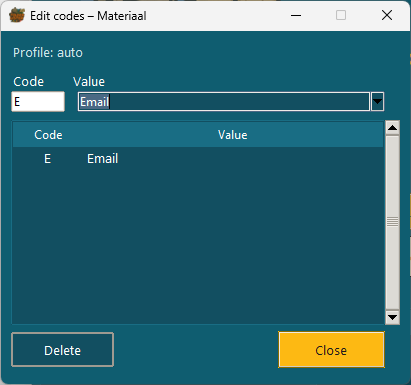
2. Edit codes for an item specific
Click Edit codes… to open the code editor for the selected item specific.
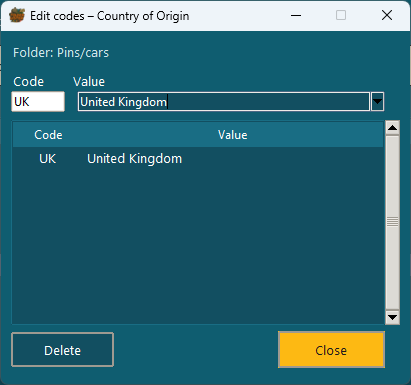
In this example, the code UK is linked to the item specific Country of Origin = United Kingdom. You can add as many codes as you like per folder.
3. Using codes in titles
![Filename example using [S] for Silver](/docs/images/title-code-example-silver-filename.png)
Once a code is defined, you can use it directly in your filenames or titles, for example:
Alexander the Great Coin[UK].jpg
During processing, [UK] is picked up as the code and converted into Country of Origin = United Kingdom for that item.
This is ideal when you want to drive everything from titles and avoid extra manual work in the Bulk Editor.
For an overview of all supported codes and advanced tricks, see the upcoming Title codes overview section.
Title codes
Title codes let you add preset text before or after your title and trigger extra automation such as item specifics, prices and quantities.
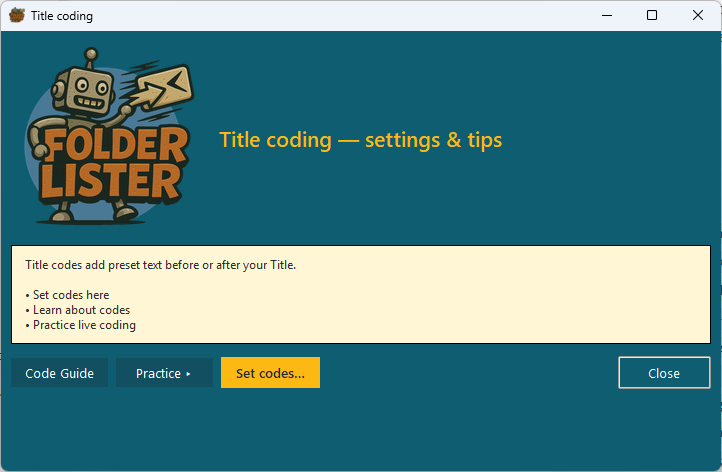
Open the Title coding window from the main menu. From here you can:
- Code guide — jump to this documentation section.
- Practice — open a live preview per folder to test which codes are active.
- Set codes… — define and edit the actual title codes.
Set codes
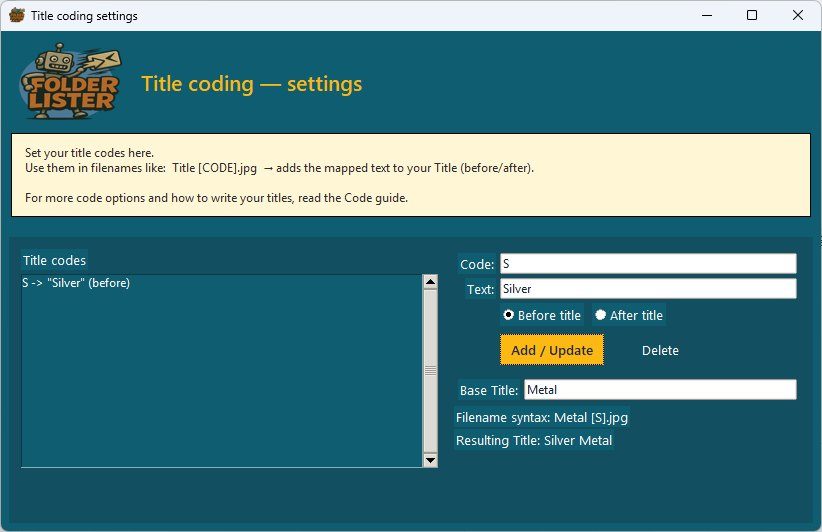
In the Title coding — settings window you define your codes. Each code has:
- a short Code (for example
S), - the Text that should be added (for example
Silver), - and whether it is added before or after the title.
In this example the code [S] adds the word Silver to the title.
Example filename:
Alexander the Great Coin[S].jpg
During the run this becomes a title like Silver Alexander the Great Coin (depending on your before/after choice). Title codes can be combined with item specifics: the same code [S] can both set the item specific Material = Silver and add the word Silver to the title, producing highly searchable listings with minimal typing.
More advanced codes for prices, BIN, bundles and quantities are covered in the overview below.
Title codes overview
This page lists every filename pattern Folder Lister can extract automatically when you load images from a folder. Use it as a cheat sheet: when you see a pattern that fits how you name your photos, you know it will be picked up.
The “Title coding” toggle
Filename parsing is off by default for new installs. This keeps Folder Lister safe for users whose filenames happen to end in digits (for example camera-generated names like Untitled 2261.jpg) — without the toggle they are not misread as prices.
You enable filename parsing in one of two places (both bound to the same setting, persisted across restarts):
- Manage listings — From folder tab: the checkbox “Title coding (filename codes)”, just below the Add files / Add folder buttons. Hover the checkbox for a quick example tooltip.
- Main menu → Title coding → Settings → “Use filename codings (price, quantity and bracket codes)”.
A change takes effect on the next Add files / Add folder action. Items already in the bucket keep the price and quantity they had at load time — reload the folder to apply the new toggle.
Always-on patterns (work even when the toggle is off)
These patterns contain an unambiguous marker (brackets [ ] or a literal n before the price) so they cannot be triggered by accident. They are parsed regardless of the toggle setting.
| Filename | Parsed as |
|---|---|
Coin[VE3]395.jpg | title “Coin”, code VE3, price 3.95 |
Coin[VE3]N395.jpg | title “Coin”, code VE3, price 3.95 (explicit N) |
Coin n395.jpg | title “Coin”, price 3.95 (explicit n marker, no brackets needed) |
Coin[VE3]395x2.jpg | title “Coin”, code VE3, price 3.95, qty 2 |
Coin[VE3]G395.jpg | title “Coin”, codes VE3 + G, price 3.95 (suffix code ‘G’ mapped via Title coding) |
Bare / Space patterns (require Title coding ON)
Filenames without brackets or an n marker are only parsed when the toggle is on. This covers the most common “title + price” convention.
| Filename | Parsed as |
|---|---|
195.jpg | price 1.95, qty 1 (no title) |
Dolphin 195.jpg | title “Dolphin”, price 1.95 |
Mascot Relax 195.jpg | title “Mascot Relax”, price 1.95 |
Dolphin 395x2.jpg | title “Dolphin”, price 3.95, qty 2 |
Dolphin 2x995.jpg | title “Dolphin”, qty 2, price 9.95 |
Dolphin 9953x.jpg | title “Dolphin”, price 9.95, qty 3 (legacy PRICE QTY x format) |
Price-vs-quantity rule for AxB patterns
When the tail of the filename is two numbers separated by x (for example 395x2, 2x995), Folder Lister decides which is price and which is quantity by digit count:
- If A is 3-6 digits (a plausible cents value): A = price, B = quantity. Example:
395x2→ price 3.95, qty 2. - If A is 1-2 digits (too small for a cents price): A = quantity, B = price. Example:
2x995→ qty 2, price 9.95.
Prices are always written as cents in the filename:
295 means 2.95, 1099 means 10.99, 12000 means 120.00. Decimal points or commas in filenames are not supported. Currency follows the eBay site you are publishing to (UK = GBP, NL/DE/FR/IT/ES = EUR, US = USD).
Bracket codes (SEO words + item specifics)
Brackets like [VE3], [S], [UK] are matched against your mappings defined in Title coding settings and your Item specifics codes. One bracket code can:
- Insert preset words before or after the title (e.g.
[S]→ “Silver” before title). - Set a structured item specific value (e.g.
[S]→ Material = Silver). - Do both at the same time when a code is defined in both lists.
Multiple bracket groups are allowed in one filename: Coin [S][UK]N395.jpg can apply Material = Silver, Country = United Kingdom, and set price 3.95 in a single pass.
Bundling extra photos to the same listing
To attach extra photos to an item without creating a new listing, end the filename with a trailing letter (b, c, d…). Folder Lister groups them automatically:
Dolphin 195.jpg     → creates the item
Dolphin 195b.jpg    → bundled extra photo
Dolphin 195c.jpg    → bundled extra photo

... 2x995.png → creates the item (qty 2, price 9.95)
... 2x995b.png → bundled extra image (b)What is NOT parsed
- Filenames with no brackets, no
nprefix, when Title coding is off. Safe default to avoid surprises with sequence-number filenames. - Number runs shorter than 3 digits or longer than 6.
Coin 1.jpgandCoin 1234567.jpgare left as title text only. - Mid-title numbers when brackets are present. In
W50 Red[VE2]G395.jpgthe50stays part of the title; only the tail after the last bracket is treated as price. - Decimal points or commas (use cents).
- Currency markers (currency follows the eBay site, not the filename).
Common gotchas
- With Title coding ON, filenames like
Untitled 2261.jpgare parsed as price 22.61. If you have camera-generated names like this, leave Title coding off or rename them before importing. - Bracket codes are matched against your known codes list. A bracket like
[XYZ]that doesn’t match any defined code is ignored for items specifics but still stripped from the title. - Changing the toggle does not retroactively re-parse already-loaded items. Use Add files / Add folder again on the same folder to pick up the new behaviour.
Combine these patterns with Item specifics and the Title codes section to drive almost your entire listing from filenames alone.